Table of Contents
MultiScatter Manual
MultiScatter is a plug-in for 3ds max which works with V-Ray, Mental Ray, Corona, Octane, Maxwell, FStormRender (others can be added by using our SDK, please contact us). It is possible to create complicated scenes with a huge amount of scattered objects easy and quickly with the aid of this plug-in.
Usually scenes in 3ds max with a great amount of even identical objects take a lot of space on HDD, consumes a lot of time for loading, and it is very hard to work with. MultiScatter is created to solve these problems. The scene containing 500 000 identical objects created with 3ds max 2008 occupies 1400Mb of HDD space. Now, if it is created with MultiScatter and still containing the same 500 000 objects the scene can take just 250Kb.
The most exciting feature of MultiScatter is a quick generation of an array of objects right before rendering. Those very 500 000 objects are created in only 2 seconds before rendering. Another outstanding MultiScatter ability is uploading and downloading from VRayProxy memory if needed (as and when necessary). This allows the application of polygon models without missing productivity and capacity of RAM.
Support for Animated objects and VRayProxy allows creating huge amounts of animated objects. Now with MultiScatter it is possible to create the whole forest of wind-shaken woods.
The support of 64-bit systems and multi core processing allows MultiScatter to create and render, for example, forest or even a city in a blink of an eye.
MultiScatter includes integrated procedural map - MultiScatterTexture. This card helps to create uncountable amount of various tones to gain a more realistic appearance of the scenes with huge number of similar objects. There can be, for example, different tones of leaves in a forest or various colours of cars at the parking area. MultiScatterTexture is able also to define different colour tones for the mixing materials, maps, etc.
MultiScatterTexture may be applied both to the MultiScatter objects and to any other objects at the scene
Below video is done with VrayScatter for 3ds max (first generation of our scattering system for 3ds max) in year 2008 on Xeon E5205 4Gb RAM machine, as a single scene
Main differences of MultiScatter in comparison to VrayScatter
MultiScatter includes all VrayScatter features such as:
- Regular and random scattering of objects over any surface or along a spline.
- Unique control system for regular scattering with UVW coordinates.
- Full control including randomisation of all transformations and scattering by masks or values.
- Control of scattering area by splines and full control of transformations of objects along the border
- Collision control inside the single MultiScatter object or between multiple.
- Scattering control relative to the camera.
- Animation of parameters as well as scattering of animated objects.
- Special textures for randomisation and control of object colour and creation of complex masks.
- MultiScatter integrates these and many other features, and was created from scratch, allowing us to bring working with arrays to a new level.
The following additional features were added:
- Support for Mental Ray (including MProxy)
- Any geometry can be used for scattering (e.g VRayScatter can only use VrayProxy)
- Unlimited number of different objects within one MultiScatter.
- Probability texture allows clustering distribution of objects, controlling size of a cluster and density of its borders.
- Multi-core processing support at all stages of workflow including viewport render.
- Any object from the current scene can be chosen for scattering.
- Materials, properties, transformations and animations remain interactively linked between objects within MultiScatter and all related objects within the scene.
- Help Pictures will help new users to navigate through the interface; this can be switched on/off.
- Revolutionised Viewport mode Points allows viewing of the objects' geometry regardless of complexity and the quantity of objects in a scene.
- Optionally MultiScatter can show wirecolor or diffused colour of objects' materials.
- Collisions inside a MultiScatter can be seen in a viewport.
- A MultiScatter object can be converted into single geometry as well as copied across instances. This allows using MultiScatter as a modelling tool and other rendering engines can be used other than V-Ray and Mental Ray.
- MultiScatter utility allows the control of huge numbers of MultiScatter objects.
- MultiPainter object. This tool gives full control for object placement with a brush.
- And many other new features.
Installation
System requirements
MultiScatter 1.097 and later:
3ds Max versions: 2014, 2015, 2016, 2017, 2018, 2019, 2020, 2021, 2022, 2023, 2024
If you use V-Ray, versions: 3.6, 4.x (Next), 5, 6, 6.1
OS: Windows 7, 8, 10, 11
MultiScatter 1.3.x.x, 1.052 - 1.093 :
3ds Max versions: 2010, 2011, 2012, 2013, 2014, 2015, 2016, 2017, 2018, 2019, 2020
3ds Max Design : from 2010 and higher
If you use V-Ray, versions: 1.5 (SP3- SP6), V-Ray 2 SP1, V-Ray 2.2, 2.3, 2.4 , 3, 3.1, 3.2, 3.3, 3.4, 3.5, 3.6, 4 (Next)
OS: Windows 7, 8, 10 all 32 and 64 bit
MultiScatter 1.2.0.12
3ds Max versions: 2008 (no Mental Ray support), 2009, 2010, 2011, 2012, 2013, 2014
3ds Max Design : all
If you use V-Ray, versions: 1.5 (RC5 -no animated proxy, SP1- SP6), V-Ray 2 SP1, V-Ray 2.2, 2.3, 2.4
OS: Windows XP, Windows Vista, Windows 7, 8, 10 all 32 and 64 bit
Installation
Please make sure you downloaded latest version of the plug-in from our forum.
Users are provided with the same installation file for both Workstation and Render node
MultiScatterFor3dsmax-1.xxx.exe
Workstation can be used only when license is properly installed, and provides access to all MultiScatter options.
If MultiScatter does not find license file it switches itself to Rendernode mode and only can open and render files created with MultiScatter Workstation.
Rendering is available both locally and over network.
To install the program you need to run the MultiScatterFor3dsmax-1.xxx.exe with the administrator rights.

Don’t forget to quit 3ds max before you start the installation. (please check Task Manager too for any running instances of 3ds max)

Read carefully the license agreement. If you accept it tick “I accept” and then press setup button; if not, press “Cancel” button.

Choose 3ds Max version and V-Ray version or select “none”, check if you need Arnold plugin (some other rendering engines have implemented support on their side)

The setup wizard will automatically select destination folder for 3dsmax. Check the path where 3dsmax is installed and correct it if needed.
This will install several files into various folders within 3ds max directory, you can see them by searching for all files with MultiScatter in their names
it will also install activation and uninstaller utilities into “System drive”:\Program Files\R&D Group\ , and there are no registry entries made
Registration
Uninstall
you can find uninstaller in: Start menu > R&D Group > MultiScatter > Uninstall
for versions 1.2.0.12 and below To uninstall MultiScatter you can manually delete all files which have MultiScatter in the names from all folders in 3ds max directory and subdirectories.
MultiScatter does not have any entries in the Registry
Installing for network or distributed rendering
For network rendering just install the same file MultiScatterFor3dsmax-1.xxx.exe. Installation procedure is the same as for the Workstation, but skipping Registration process. Rendernodes do not require registration.
Submission for network or distributed rendering should be done from the PC with the registered version of MultiScatter. The rest of render nodes involved in the network or distributed rendering do not need to be registered
Each MultiScatter license comes with unlimited render nodes.
manual installation on render nodes:
extract files by running installer and pointing into empty folder, then copy extracted file to other rendernodes
Update
You can always find latest version at our forum (login is not required for download)
your old activation should work, no need to apply it again, its stored in C:\Program Files\R&D Group\Cerber\localLicenses and available to all users, 3ds max versions and plugin versions installed on your PC.
in case of problems it will prompt you to update activation on first run.
MultiScatter creation
Getting started
To create MultiScatter go to Create > Geometry > MultiScatter > MultiScatter

If any object was selected during the creation, MultiScatter will automatically use the surface of the selected object for the distribution over it.
Once MultiScatter is created it is necessary to switch to ‘Modify’ panel and select the objects for distribution at the scene. Press ‘+Teapot’ button before the selection. The selected objects will be used for distribution. The distributed objects will have the same material as the original object.
Do not remove original objects after their selection for MultiScatter. It is recommended to position them in a hidden layer, all objects inside MultiScatter inherit properties of the original.

You can select any objects, Vrayproxy and Mentalproxy at the scene. After all required objects are selected press right button of the mouse or the ‘+teapot’ button once again.
You can also add the list of objects by pressing the ‘+list’ button

Selected objects can be removed from the list by pressing the ‘-teapot’ button.
Base Parameters

The main distribution setting is the number of objects. It is set by Max Count value. If you are not satisfied with the current variant of random distribution, correct Seed
On/Off - Turns on or off MultiScatter
Seed - that is the option setting random object distribution. Any changes in this option lead to a new random redistribution of objects.
Max Count – the number of multiplied objects. It fixes the maximum number of objects possible. The resulting number of objects will be no more than set value.
Max Preview – the number of objects to show in viewport
Samples Parameters

Scatter Objects - list of objects to multiply
Probability - is the probability of the object’s distribution in regard to other MultiScatter objects
Mask - is the probability mask. The brighter texture is the more probable this place is for the distribution of this type of objects.
Keep Object ID / Override ID - use material ID from object or setup your own
Mask contrast controls the contrast value of the probability mask. High contrast value makes borders of object areas more defined. The example below presents distribution of three types of objects; for each of them noise maps with different phases are used as masks. Mask Contrast is set to 100. The borders of object areas are sharp due to the high contrast value.

Object Colour - This setting is described in the MultiScatterTexture section
Coll Shape - you can choose default (for compatibility with older versions prior to 1.528), sphere or box depending on topology of objects
Examples of different masks application
Noise

Falloff towards the camera

Falloff towards object Z-axis

Vertex Paint (Important note! Use texture channels - for example the 2nd - for keeping colour parameters since the MultiScatter Vertex Color channel is not applicable due to certain peculiarities of scatter creating algorithms.)

Distribution Parameters
To define surface or spline for MultiScatter objects distribution you need to either create MultiScatter while the object for distribution is selected, or after MultiScatter is created you can select surface or spline by pressing “Surface” or “Spline” button.

Mask – that is distribution mask. Assuming that a monochrome greyscale mask is applied, objects will not be reproduced on black coloured areas. On white areas the density of objects remains unchanged. It is not recommended to use large surface with rare white mask areas as this will slow down generation. Try to crop surface so that it will contain less black coloured areas.
Key Color – you can use colour masks for object distribution if this option is set active. The nearby “Color Picker” allows you to select the particular colour on a mask over which further distribution will take place.
Tolerance - it sets the objects scattering range beyond the borders of the selected coloured area when the colour mask is applied.
Spline Width - is the thickness of objects distribution in reference to spline (it is set in system measure units)
Use Random Position - it activates object distribution based on random algorithms which are set in ‘Random Position Settings’ section
Use Regular Pattern – it activates regular object distribution which is set in ‘Regular Pattern Settings’ section
Random Position Settings

Use Density. With it you can set the number of objects (Count) to be located at a single area unit (per). The resulting number will also be fixed with ‘Max Count’ option. The area is defined by system units. It means that in the case when centimetres being used in system units one single object will fall within 1 square meter.
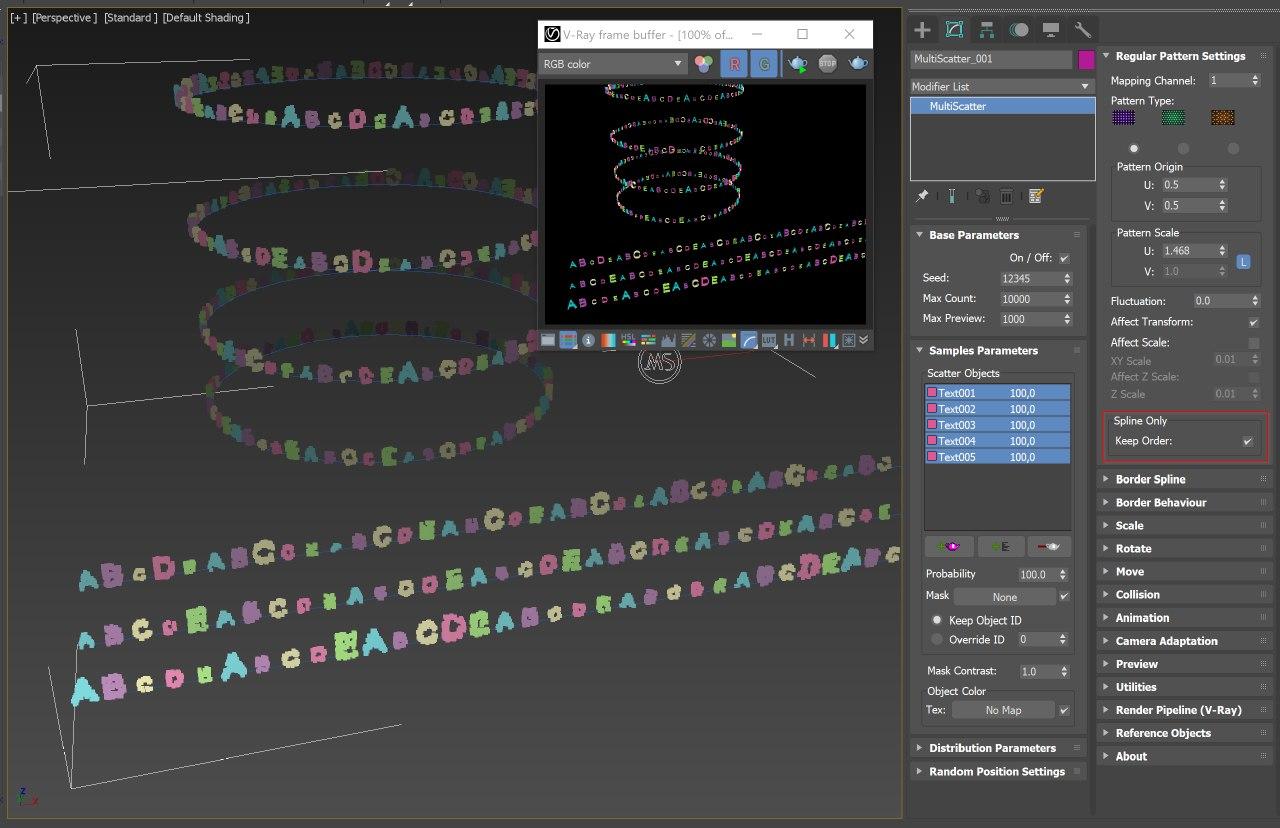
Regular Pattern Settings

Regular distribution requires the presence of correct UVW Mapping of the object for distribution. You can control regular distribution with UVW Mapping as usual texture.
Mapping Channel sets the channel for UVW Mapping to be used for distribution

The following options are provided to change the type of regular distribution: Square (square grid), Triangle (triangular grid), Hexagon (hexagonal grid).
Pattern Origin -
Pattern Scale -
Fluctuation gives an opportunity to add some randomness to regular distribution.
With default settings texture coordinates set only location of objects, but not their rotation and scale. Activation of Affect Transform option lets you set rotation of objects to UVW Mapping. For example, rotating UVW Mapping Gizmo, the objects will be rotating the same way following texture rotation. If you need to control not only rotation, but scale also then turn on Affect Scale option. With this, the scale of objects can be change suddenly. For controlling the scale use XY Scale and Z Scale options if necessary. With ‘Affect Transform’ option active, ‘Use Normal’ setting of the ‘Rotate’ settings should be set as 0.0.
Keep Order - For spline only, to keep order of objects as they are listed, screenshot
Border Spline

It is possible to limit objects disposition with spline. You can use only one spline. If you need to limit the disposition with several splines, then attach them first into one single spline.
You can use different projection axis of spline on surface. If your surface, for instance, is not horizontal (a wall of a building, for example), you can use X-axis or Y-axis depending on orientation of surface. The axis should be perpendicular to the surface.
Distribution inside spline is sensitive to its direction. Use Inverse command in spline properties to change the direction of spline.
It is recommended to use border spline around the surface.
Render Time Clipping - directly works with V-Ray only, for Corona use additional MultiScatterBorderTexture as opacity map
Clipping mode you can choose Lower Strand Vertex or Exact (shade point)
Border Behaviour

As a border you can use surface sides (Use Surface Border) and border spline (Use Spline Border). The impact of borders upon the object distribution can be controlled by density (Affect Density), scale (Affect Scale) and rotation (Affect Rotate). The depth of impact is set by Distance.
Using curves you can control different types of border impact by distance from the border. The left part of a curve sets behaviour closer to the border. The right part of a curve sets behaviour in a Distance of an object from the border.
Scale

Global that is the scale control of objects at all axial directions – XYZ - proportionally.
From and To are to fix the variation limits of scale. If the scale should be equal for all objects, set these parameters equal to each other.
From = 100, To = 100.

From = 100, To = 300.

From = 300, To = 300.

Mask sets scaling of objects upon the texture. Black colour equals to zero scale, white colour leaves the scale unchanged.
Using of ‘Noise’ within the scale mask.

Here is an example of ‘falloff’ application in ‘distance blend’ mode within the scale mask

Min Scale sets the minimum scale of objects, which does not allow objects with less scale value to be represented. For example, it is required to fix appropriate minimum scale value for such objects as trees to prevent some of them from being presented smaller than bushes.
Local settings allow independent scaling of objects at each of the axes locally.
Rotate

Constant
Constant settings make all objects rotate at the same angle.
X = 0, Y =0, Z = 0.

X = 45, Y = 0, Z = 0.

X = 0, Y = -45, Z = 0.


Random
Random parameters set additional random rotation around each axis
X=60, Y=0, Z=0.

X=0, Y=60, Z=0.

X=0,Y=0,Z=360.

X=60, Y=60,Z=360

Use Normal

Use Normal If the objects should be oriented along the normal towards the surface, set this at 1.0. Different values of this setting and the respective results are presented below:
Use Normal = 0.0

Use Normal = 0.5

Use Normal = 1.0

Use Normal = 4.0

Z Recovery

Z Recovery – this setting makes the object rotate so that its Y axis get the same direction as its Z axis deflection – like it is shown in the picture below:

Mask

Mask. Rotation can be controlled by colour mask where each colour corresponds to its axial rotation. Red colour is responsible for X axial rotation, green colour is for Y axial rotation, and blue colour makes Z axial rotation. Colour value 0.0 equals to rotation of 180 degrees to one direction, colour value of 0.5 leaves the rotation state unchanged, colour value of 1.0 makes the rotation of 180 degrees to another direction. If some axial rotation is not needed just untick respected axis in the settings window.
The use of various textures within the rotation mask
Coloured Noise

Gradient Ramp

Rotation of objects upon animated texture can be used for creation of wind effect. In this case swinging range can be controlled by Map Intensity setting.

Move
Movement with relation to the initial position.

These parameters are applied in case of necessity of spatial spread of proxies. First column sets starting range of object displacement within the axial direction of the coordinates, second column sets the final range of displacement.
Below example presents Z-axis direction variation from -3000 to 5000.

Collision

In case of creating some reasonably big objects, such as trees, any overlapping of objects is not allowed. Use collisions to prevent the objects from overlapping. Collision checking is based upon the creation of virtual sphere around each object and further distribution of objects with regard to overlapping inability of these spheres. The sphere has its radius set and the height from its centre above the surface is also set. Each object can generate collisions so that they have influence to the rest of objects and can also adapt to the collisions generated by the other objects. The result of collisions of the objects belonging to the same MultiScatter is presented in viewport. The collisions of the objects belonging to different MultiScatters can be seen only during rendering.
Tick on the Generate Collision and Receive Collision options. Set the ‘Height’ value at 0.0.
The radius of collisions default value is equal to 100% - that is corresponds to the object size.
The result after rendering will be as below

Let’s add one more object type of smaller size.

In case the distance between the bigger objects is preferable to be kept, but the smaller objects are desirable to be moved closer to the bigger ones, the collision spheres of the bigger objects may be placed a bit higher so that the smaller objects may be placed closer to them. Set the Height for the bigger objects equal to the half of the radius value or a bit higher

Penetration sets the blur of the collisions border areas.
Coll Shape - you can choose default (for compatibility with older versions prior to 1.528), per-object, sphere or box depending on topology of objects
Animation

Please note that these settings only control animation of objects itself which are distributed over surface or spline.
The use of animated masks for distribution, scaling, rotation, etc., and also the application of procedure textures for masks, animation of splines and surfaces are free and available. Evidently, the results of combining all these animation types are not always predictable.
Animation section controls animated VrayProxies and objects. Animation of mrProxy is not implemented at the moment.
Speed sets the speed of animation. Animation speeds up if speed value is higher than 1 and slows down when the value is lower than 1.
It is necessary to arrange animation time shift for each one of the reproduced animated objects so that to prevent them all from moving simultaneously. The creation of a unique time shift for each object is regarded as impossible due to the overwhelming exploration of the memory. Usually it is enough to confine to some fixed set of time shifts. The number of them is set by the Samples setting. If the animation speed is a fractional number then some fractional frame numbers can appear, which can sometimes lead to a faulty rendering. In case of any malfunction here just dismiss the activating tick next to the Enable fractional frames option. Dealing with looped animation of objects it is highly recommended to select the Loop animation type. If the animation is not looped, then select the Ping Pong animation type. Once option makes a single animation of the object, without any repetition. Single option makes a single frame.
Samples = 1

Samples = 10

Offset lets set animation time shift within the limits of From and To
The same setting can be also fixed within mask with aid of Mask option.
In this mask white colour corresponds to the From setting and black colour corresponds to the To setting.
Camera Adaptation

Camera sets the camera with regard to which the distribution will take place. Use Camera Ranges - activates object distribution depending on their distance from the camera
Near Range/Far Range sets the distance beyond which the objects will not be distributed.
For static shots it is convenient to control density (Affect Density) depending on the distance from the camera.
Density control is not suitable for animation (objects will appear suddenly in front of the camera). Scale control (Affect Scale) is more convenient for animation. It is recommended not to use Collision together with Camera Clipping for animation.
Preview

It is possible to select the type of object preview at view ports from bounding boxes (Box) to pyramids (Pyramid), or turn off preview at all (None).
Besides, a new revolutionary method of object preview is implemented (Points) – it presents the objects as the points distributed upon the surface of the multiplied objects. The setting of Count fixes the overall number of these points at view port and can be set depending on the capacity of your PC. The points are dynamically distributed in real-time mode upon the surface of objects depending on the angle of view and the perspective. This allows good presenting of the size and shape of objects as the closer the object is to the camera the more points are used to present it. In addition, the colour of the points correlates with the diffusive material colour assigned to the object.
You can activate automatic updating of object preview (Auto Update) to get total control over the distribution of objects. With this option turned on every single change in MultiScatter parameters is previewed in real-time mode (except the number of objects during rendering and animation settings). If your scene is too heavy you can switch to manual, untick Auto Update and click on manual each time you need to update.
Dummy Size – sets the size of MultiScatter Gizmo at view port.
Utilities
Help Pictures

Show/Hide Help Pictures button activates/deactivates helping pictures for MultiScatter interface.
Reset All Settings to Default button restores all MultiScatter settings to the default values.
Collapse to Single Mesh button converts MultiScatter into Editable Mesh. Since MultiScatter can contain very heavy geometry, the following warning window will be displayed before the creation of the resulting object.

This will help to judge the ability to create such object. If the amount of polygons is huge the process of conversion can take very long time or even fail.
Select All Dependences selects all objects in the scene used in MultiScatter (objects, surfaces, splines and border splines)
Convert to MultiPainter converts to MultiPainter
Please note that MultiScatter can quickly process significantly larger amount of objects than MultiPainter, and converting to MultiPainter may be impossible when trying to convert from MultiScatter with large amount of objects in it.
Render Pipeline (V-Ray)

Reference Objects

MultiPainter creation
MultiPainter object
To create MultiPainter go to Create > Geometry > MultiScatter > MultiPainter

If any object was selected during the creation, MultiPainter will automatically use the surface of the selected object for the distribution over it.
After the creation of MultiPainter it is necessary to switch to ‘Modify’ panel and select the objects for distribution at the scene by drawing. Press ‘+Teapot’ button before the selection. The selected objects will be used for distribution. The object matter of the distributed objects corresponds with that of the original ones. Do not remove original objects after their selection for MultiScatter. It is recommended to position them in a hidden layer, all objects inside MultiScatter inherit properties of the original.

You can select any objects, Vrayproxy and Mentalproxy at the scene. After all required objects are selected press right button of the mouse or the ‘+teapot’ button once again.
You can also add the list of objects by pressing the ‘+list’
Selected objects can be removed from the list by pressing the ‘-teapot’ button.
Each of the objects has the following options:

Probability – is the probability of the object’s distribution in regard to other MultiPainter objects.
Collision Rate - Defines the possibility for objects intersection. If set to 0 - an object can be completely inside the other, at 100 - the objects do not intersect.
MultiPainter selection
MultiPainter has the ability to manipulate (move, rotate, scale, copy) objects it contains. To do this, go to the sub-object level.

After that, you can select objects with the mouse and manipulate them just like regular objects in 3ds max.
When you are in sub object, menu Selection – becomes available.

Select by list - highlights all sub-objects selected in the Scatter Objects list
Hide Selected - hides selected sub objects from the viewport
Hide Unselected - hides from the viewport not selected sub objects.
Unhide All - unhide all sub-objects.

Collapse to Single Mesh button converts MultiPainter into Editable Mesh.
Placement of objects with a brush

Radius – brush size
Softness - the softness of edges of the brush
Intensity – the intensity, the density of the arrangement (depending on the settings of collisions)
Paint – turns on drawing mode
Erase - turns on erase mode
The process of scattering involves only the objects and the surface of the currently selected in the list of Scatter Objects and Surfaces You can stop drawing any time, highlight or deselect the desired objects and surfaces and to continue drawing with the new settings.
Surfaces

In the menu Surfaces you can select surface on which the arrangement of objects will be made. The interface is similar to Scatter Objects
It should be noted that the influence of objects positioning parameters is performed at the time of their positioning that ideologically distinguishes the setup MultiPainter from MultiScatter. All changes you make in these settings will affect the next “Drawing with a brush” session.
Other MultiPainter settings

Rotate, Scale, Animation and Preview menu is completely the same as the corresponding menu in MultiScatter. It should be noted that the influence of objects positioning parameters is performed at the time of their positioning that ideologically distinguishes the setup MultiPainter from MultiScatter. All changes you make in these settings will affect the next “Drawing with a brush” session.
MAXScript functions
getMultiPainterInstanceCount – return current instance count for MultiPainter.
getMultiPainterInstanceTM – return instance TM as for Instace in MultiPainter.
setMultiPainterInstanceTM – set instance TM for Instace in MultiPainter.
MultiScatterTexture
In spite of all possible random rotations and scaling the reproduced objects may look monotonous and alike. There is a certain lack of colour variety. MultiScatterTexture solves this problem.

Texture plate consists of 8 colours and each colour has tones. Final colour comes as the result of random mix of initial colours according to the established proportion. Change of seed value leads to the appearance of new random colour scheme.
Mix Contrast provides quick contrast control of the resulting colour scheme.
Let’s return to the Colour setting of MultiScatter properties:

Suppose you have got a bird eye view photograph of a valley, or the one obtained by means of air-photography. And now you would like your 3D valley to be alike this photo in the matter of colouring. Then, create a texture out of this photo. Set an appropriate textural mapping for your surface carrying the growing grass. Place the prepared valley texture in the Color section of the scatter settings. It is not necessary to set this texture for the surface itself. Apply MultiScatterTexture with the checkmark of the Use Obj. Color option for the grass texture processing. As a result the multiplied grass objects will be coloured in valley texture imitation.

In case the additional variation of texture with random deviation is necessary you just need to checkmark the Mix with Color option. In this case you should better use colours of the grey scale which will not vary the initial texture greatly; otherwise the resulting colours may appear too saturated.
Mix Value provides the intensity control of the object’s colour mix with the colours set in MultiScatterTexture option
Attention! At the moment MultiScatterTexture works with any objects created with Vray and MentalRay, except MentalProxy objects. This is due to the peculiarities of the concrete implementation of MentalRay for 3ds max.
Collision object - MSCollision

You can create collision object from the panel: Create>Geometry> MultiScatter > MSCollision
MSCollision object is presented as Gizmo located at the scene, it generates collisions within itself and affects all MultiScatter objects in the scene with their Receive Collision option activated.
Radius sets the radius value for Gizmo.
Penetration sets the blur of the collisions border areas.
MultiScatters management utility
You can run this utility from the panel: Utilities > More…> MultiScatterTools

In the upper part there is a window with the list of all MultiScatter objects at the scene.
Green circle next to the object name means that the object is active, so it is presented at viewport and while rendering. Grey circle means that this object is not active, so it is not presented at viewport and while rendering.
Use the mouse left button to select MultiScatter objects. Use the combination of Shift and Ctrl keys to select several objects at once.
Select All selects all MultiScatter objects at the scene.
Deselect All cancels the selection of all MultiScatter objects at the scene.
Turn Off Selected Scatters deactivates/turns off the selected objects.
Turn On Selected Scatters activates/turns on the selected objects.
Generate Objects converts selected MultiScatter objects into arrays of instance objects. This allows the application of the generated objects with any render engine different from V-ray and Mental Ray.
Select Objects allows you to select all objects at the scene that are generated on the basis of the same MultiScatter object. Since the names of all these objects start with the name of their original MultiScatter object, you just need to enter this name in the appropriate panel/window.
Troubleshooting
First of all, please make sure you are running latest version of MultiScatter, it can always be found on our forum https://forum.icube3d.com/viewforum.php?f=16
License errors

In case of license errors (which can be caused by disk reformatting, re installation of the operating system or components replacement) you are free to address the developer at any time by sending your request for a new *.lic file to the e-mail support@icube3d.com
activation manual is here https://docs.icube3d.com/en:cerber-protection
Installation problems

make sure 3ds max is not running, (please double check in task manager too)
make sure you are installing with administrator rights (in windows 7 right click “run as administrator” even if you are logged in as admin)
make sure you choose right path for you 3ds max version
V-Ray spawner hangs
Problem: After each distributed rendering job V-Ray spawner hangs and needs restarting.
Solution: If you keep the option “restart slaves on render end” checked then V-Ray spawner should be restarted automatically when the job is finished. However it takes a little time for the spawner to restart. You may have noticed when restarting it manually that it takes several seconds for the vraydummy.max to appear. Please wait a while before you submit another job, so that the spawner restarts. I mean do not start the next render immediately , but after several seconds.

Dll errors
Error code 127
- Error Loading Plug-in Dll
- MultiScatterVRay.dlo failed to initialize, error code 127 - Thespecified procedure could not be found

please make sure you choose correct V-Ray version during MultiScatter installation
also, if you change V-Ray version you need to reinstall MultiScatter as well, as there is separate V-Ray connector file MultiScatterVRay.dlo for each V-Ray version
Error code 126
- Error Loading Dlls
- Dll failed to initialize
- Error code 126 - The specified module could not be found
- MSVCR100.dll missing error
- MultiScatter.dlo failed to initialize.

please make sure you have Microsoft Visual C++ 2010 Redistributable Package 32bit and 64bit installed
Microsoft Visual C++ 2010 Redistributable Package (x86)https://www.microsoft.com/en-gb/download/details.aspx?id=5555
Microsoft Visual C++ 2010 Redistributable Package (x64) https://www.microsoft.com/en-gb/download/details.aspx?id=14632

if it still doesn't help please check that you installed correct V-Ray version for your 3DS Max
Crashing
there are some common issues (and they are not related to the plug-in itself):
Using NormalBump
Please check that you are not using NormalBump with V-Ray, use VrayNormalMap instead (please refer to V-Ray support for this issue)
Light Cache issue
Light Cache is very fast algorithm, but there are some drawbacks. Light Cache needs much more RAM than other V-Ray GI algorithms. MultiScatter is tool for creating huge amount of geometries which also needs RAM. therefore there is a big chance to encounter problems (very slow rendering or crashing) when you use LC with MultiScatter.
So using Light Cache in exterior visualisation consumes lots of memory wherever you are using MultiScatter or not, and its just our very general recommendation not to use it, unless you really know what you are doing and have tons of memory.
Problems with materials
when using V-Ray we strongly advise to use only materials designed for V-Ray
e.g using Architectural materials with V-Ray may cause it to crash as its designed for Mental Ray
using Standard materials may also cause crashing with V-Ray.
Basically speaking, incorrect material may render fine with small CPU or RAM errors, which may be unnoticed when rendering a single object, but when you multiply it thousands or millions times with MultiScatter this problem will just grow exponentially and instantly crush the system.
Using groups
Avoid using grouped objects for scattering and as a surface, MultiScatter support only geometries, but groups may include other non-supported objects
Group scattering is added from version 1.524
Other errors
Please make sure you download and install latest version from our forum and confirm that update was successful by checking version number in About panel of MultiScatter.

if this have not solved the problem please contact us at support@icube3d.com , by sending description of the problem together with the following information:
- MultiScatter version (screenshot of About panel is required)
- OS version (inc 32 or 64 bit)
- 3ds max version
- VRay version
- some screenshots
- and file with the problem when possible